UseContext Hook for beginners
React Hooks

Prerequisites:
- Knowledge of useState and how it works
- Working with components
What is React context and why do we use it?
React context is way to manage states globally. To manage states globally we use useContext hook.
Problem:
Ever encountered a problem where we want a state variable to be accessible in all the components?
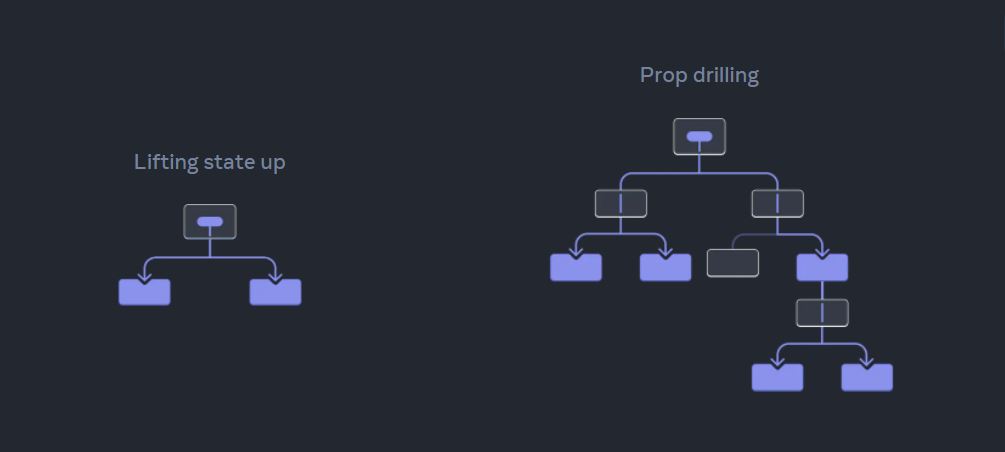
One way to handle this problem is by prop drilling.
Prop drilling is the process of sending props from one component of a tree to another by going through other components that do not need the data, but only help in passing it through the tree.
But don't you think this method of passing props down through a lot of components can become quite verbose and inconvenient. So, is there a way we can handle this problem easily? Yes, this problem can be easily solved with useContext hook. So, let's not waste anymore time and let's get started.
So, what's the solution?
The best way to learn any concept is learn by doing. So open your code editor and code with me. To make everything simple and easy to understand, I have taken a very simple program. Let's first see this program in a single component.
import React, { useState } from "react";

export default function Counter() {
  const [state, setState] = useState(0);

  const handleIncrement = () => {
    setState((prev) => prev + 1);
  };

  const handleDecrement = () => {
    setState((prev) => prev - 1);
  };

  return (
    <div>
      <p>{state}</p>
      <button onClick={handleIncrement}>Increment</button>
      <button onClick={handleDecrement}>Decrement</button>
    </div>
  );
}
In this program, we are just creating 2 buttons Increment and Decrement. To increase and decrease the value of the state counter variable, I have created 2 functions to handle increment and decrement.
Let's see how this can be done using useContext hook. We want the value of the state variable to be accessible in all the other components. So, let's dive into that.
Using useContext hook
This is how your folder structure will look 👇

Step 1: Create a context file named counter-context.js.
- Import
useContextfrom react. - Create a context using
createContext().const CounterContext = createContext(); - Now, create a context provider function component. This component will take children as prop.
- Declare a state using useState. This is what we will pass to all the other components.
- Next, we wrap the children prop with CounterContext.Provider which takes value as state variables.
- Last, we export CounterContextProvider and CounterContext. We will use them later.
This is how your program should look like 👇
import React, { useState, createContext } from "react";

const CounterContext = createContext();

const CounterContextProvider = ({ children }) => {
  const [state, setState] = useState(0);

  return (
    <div>
      <CounterContext.Provider value={{ state, setState }}>
        {children}
      </CounterContext.Provider>
    </div>
  );
};

export { CounterContextProvider, CounterContext };
Step 2: Wrapping the App component in the index.js file
Now, that we have our state variables available in the CounterContextProvider, we will import it in the index.js file and wrap the App component with the CounterContextProvider. This is how we pass the values to the App component.
import { StrictMode } from "react";
import { createRoot } from "react-dom/client";
import App from "./App";
import { CounterContextProvider } from "./Context/counter-context";

const rootElement = document.getElementById("root");
const root = createRoot(rootElement);

root.render(
  <StrictMode>
      <CounterContextProvider>
        <App />
      </CounterContextProvider>
  </StrictMode>
);
Step 3: Create a component Counter.js
To show that that we can pass it across all the components, I am going to create a component and add it to the App.js file. You can directly write the same code in the App.js file, if you do not wish to create another component.
import Counter from "./Counter";
import "./styles.css";

export default function App() {
  return (
    <div className="App">
      <Counter />
    </div>
  );
}
Step 4: Create a component Counter.js
This is where the main logic of the program lies. It is exactly the same as the one we did in the beginning. The only difference you are going to notice is how we receive the values of the state variable.
- Import
useContextfrom react andCounterContextfrom the counter-context.js file - To extract the values, we do
const { state, setState } = useContext(CounterContext); - Create 2 buttons
incrementanddecrement. Create 2 function to handle both the events. Change the value by setting the state.
import React, { useContext } from "react";
import { CounterContext } from "./Context/counter-context";

export default function Counter() {
  const { state, setState } = useContext(CounterContext);

  const handleIncrement = () => {
    setState((prev) => prev + 1);
  };

  const handleDecrement = () => {
    setState((prev) => prev - 1);
  };

  return (
    <div>
      <p>{state}</p>
      <button onClick={handleIncrement}>Increment</button>
      <button onClick={handleDecrement}>Decrement</button>
    </div>
  );
}

Problem with Context
Once, you learn how to use context, you might want to use it everywhere because it is so easy to use and makes everything simpler. The problem with context is that everything that consumes a context re-renders every time that context’s state changes. Thus, using too many contexts can cause performance issues. So, before you use context, try passing props or passing JSX as children. If neither of them works for you, you can always switch to context.
Practice Set:
For your practice try creating a theme-context and add it to your App component.
First try to do it yourself. Don't peek into the solution yet. If you face any problem, you can always refer to the solution. Best of luck!
Step 1: Create a file named theme-context.js
import React, { useState, createContext } from "react";

const ThemeContext = createContext();

const ThemeContextProvider = ({ children }) => {
  const [theme, setTheme] = useState("light");

  return (
    <div>
      <ThemeContext.Provider value={{ theme, setTheme }}>
        {children}
      </ThemeContext.Provider>
    </div>
  );
};

export { ThemeContextProvider, ThemeContext };
Step 2: Wrapping the App component in the index.js file
import { CounterContextProvider } from "./Context/counter-context";
import { ThemeContextProvider } from "./Context/theme-context";

const rootElement = document.getElementById("root");
const root = createRoot(rootElement);

root.render(
  <StrictMode>
    <ThemeContextProvider>
      <CounterContextProvider>
        <App />
      </CounterContextProvider>
    </ThemeContextProvider>
  </StrictMode>
);
Step 3: Updating the Counter.js component
import React, { useContext } from "react";
import { CounterContext } from "./Context/counter-context";
import { ThemeContext } from "./Context/theme-context";

export default function Counter() {
  const { state, setState } = useContext(CounterContext);
  const { theme, setTheme } = useContext(ThemeContext);

  const handleIncrement = () => {
    setState((prev) => prev + 1);
  };

  const handleDecrement = () => {
    setState((prev) => prev - 1);
  };

  const handleTheme = () => {
    setTheme(() => (theme === "light" ? "dark" : "light"));
  };

  return (
    <div className={`container ${theme}`}>
      <p>{state}</p>
      <button onClick={handleIncrement}>Increment</button>
      <button onClick={handleDecrement}>Decrement</button>
      <button onClick={handleTheme}>Toggle theme</button>
      <p>Current theme is {theme} mode</p>
    </div>
  );
}
Tadaaa...done!!!


Final thoughts
Once you learn how to use context, it becomes a child play and you want to use it everywhere. As long as it does not cause any performance issues, there is no problem using contexts. Once, you learn how to use context, I want you try redux. Both are excellent tools for their own specific niche.
So now you are well aware of how useContext hook works. Hope you understood it. Do leave your feedback in the comment section. Don't forget to practice and happy coding!
Resources:
To learn more about useContext hook, read Passing Data Deeply with Context.

